![]()
A basic drum kit setup usually consists of a bass drum, snare drum, hi-at, and one or two cymbals. (one or more crash cymbals and a ride cymbal). Among the drums, the bass drum stands out as the largest and produces the lowest pitch. And it’s played with a pedal by the foot of the drummer (usually the right foot of a right-handed person. Or the left foot of a left-handed person). The snare drum is a smaller drum that sits on a stand between the drummer’s legs as he sits at the drum kit. It is the center or heart of the drum set. And of course, it’s played using drumsticks.
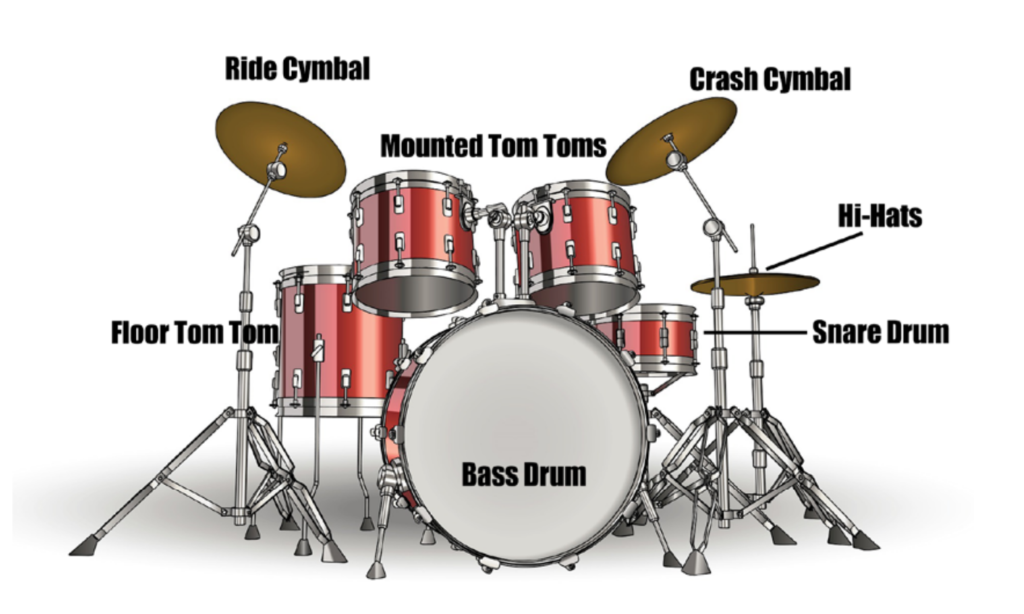
The hi-hat is a unique set of two cymbals mounted on a stand and opened and closed with a foot pedal. (The opposite foot to the bass drum foot). Finally, the cymbals provide an important range of sounds for the drums. From gentle tinkles to sharp crashes.
There are also, in most cases, one or two tom-toms fixed to the bass drum. And another supported by three legs to the side of the drummer.
All these elements combine to create the distinctive sound of the drums. And in essence, it is the basic drum kit setup. See the image.
Let’s go into this with a little more basic detail.
Basic Drum Kit Setup Components
There are a few things you’ll need to set up a basic drum kit. First, you’ll need a bass drum, which is the largest drum that you hit with a pedal. As suggested, a right-handed person would use their right foot on the bass drum pedal. You’ll also need at least one tom-tom mounted on the bass drum. Two tom-toms would be better from a practical point of view. The bass drum mounted tom-toms are smaller drums that you play with sticks. The sizes are usually (but not always) 8″ and 10″ or 10″ and 12″.
You’ll also need a snare drum, which is a thinner drum than the tom-toms. Most drum kits also use a floor tom which is usually the deepest sounding tom-tom. These are usually 14″ or 16″. Although other sizes such as 18″ may also be available.
Finally, you’ll need two cymbals, one or more crash cymbals, and a ride cymbal. The ride cymbal is usually between 18″ and 22″ in diameter. With crash cymbals ranging from 12″ to 18″, sometimes smaller. Such as splash cymbals of varying sizes or larger (20″) crash cymbals and or a china cymbal.
As well as having all these drum kit components, you would need a drum stool or throne as they are often called.

Once you have all these components, you can start setting up your kit.
Basic Drum Kit Setup
Place the bass drum in front of you with the two toms on top. Add the snare drum in front of you between your legs. As you place your feet on the two pedals (bass drum and hi-hat pedals). Then angle and position the tom-toms and snare drum so that they lean in towards you. Making them much easier to hit when it comes to playing them. The floor tom-tom then goes to your right, presuming you are a right-handed drummer.
Then set up your cymbals on either side of the kit.
The ride cymbal (the biggest cymbal) goes to your right as you sit at the drums, and the crash cymbal is on your left. if you have more than one you can place one on each side. Be sure to angle everything so they slope in towards your drum stool.
The image to the side shows an example basic drum kit setup. Of course, this would all depend on the drums you have. I will presume that you have the basic five-piece kit. The essentials, from a practical point of view.
Basic Cymbals
As already suggested, a basic drum kit usually consists of a kick (bass) drum, snare, a few tom-toms, and a set of cymbals. The cymbals can be one of the most expensive parts of the kit and come in a variety of sizes and shapes. The three basic types of cymbals are ride, crash, and hi-hats. The ride is the largest and heaviest cymbal and it’s used to keep a steady beat with your right hand. The crash is thinner and brighter sounding and it’s used for playing accents at the beginning of song sections and so on.
The hi-hats are a pair of small cymbals that are played with a foot pedal. They come in different sizes, but the most common is the 13″ and 14″ sizes. With all the different types and sizes of cymbals available. It can be daunting to try to choose the right ones for your kit. But, starting with the basics will give you a good foundation from which to build your perfect sound. Below is a small chart showing the cymbals and most common sizes.
| Cymbal Type | Most Common Sizes | Other Sizes |
|---|---|---|
| Crash | 12″, 14″, 16″ | 13″, 15″, 18″ |
| Ride | 20″, 22″ | 18″ |
| Splash | 8″, 10″ | 6″, 12″ |
| China | 16″, 17″ | 14″, 18″, 20″ |
These are only the most common sizes that are available and not a complete list. But they will give you an idea of what’s commonly available.
Basic Cymbal Setup
Ride Cymbal: The exact configuration will vary depending on personal preferences. There are a few key cymbals that every drummer should have. First, you’ll need a ride cymbal. As before suggested, this is the large cymbal that you play with your right hand. And it’s used to keep a steady beat in conjunction with the closed hi-hats. these two are interchangeable. The hi-hat serves a fundamental role by establishing the beat in song verses, while the ride cymbal takes center stage during the chorus sections. But this is open to interpretation as both can be played within either verse or chorus.
It should be noted that whenever you are playing the ride cymbal. The hi-hat is usually played (with the left foot) on beats 1, 2, 3, and 4 to keep time and create a flow.
Hi-hats: Next, you’ll need a pair of hi-hat cymbals. This is a small pair of cymbals (14″) that are mounted on a stand. And they’re played with your hand (right hand in most cases) when your left foot is pressed into the pedal. Varying degrees of pressure with the left foot can be applied to simulate different sounds. You would use drumsticks when playing on the cymbals themselves. Usually with the right hand (or both hands). Again, as suggested, the hi-hat is often played with the foot on beats 1, 2, 3, and 4, to convey a pulse and keep basic time. In this case, the two cymbals are brought rapidly together to play a tighter beat.
Crash Cymbals: Finally, you’ll need one or more crash cymbals. These are larger cymbals used for accenting certain beats. The first beat at the beginning of a new section within a song or specific phrases within the song and so on.
While there are other types of cymbals available. The three we mentioned here are the essentials for any basic drum kit setup.
When setting the cymbals up at the kit, it’s important to keep them within easy reach. And set it at a slight angle to make striking any part of the cymbal easy. There are of course no hard and fast rules and you are free to do as you will when setting the cymbals up. But that said, you should always place the cymbals where they can be played easily, with little effort. Don’t set them up so they look good for example.
Drum Sticks
Drumsticks are the most essential piece of equipment for a drummer. After all, without them, you wouldn’t be able to create the fantastic drumming you are capable of! But with so many different types and sizes on the market, it can be tricky to know which ones to choose. The first thing to consider is the material. Drumsticks are typically made from various types of wood. Including, hickory, maple, and oak. But also birch, rosewood, ash, lancewood, and ebony.
In the end, you should be looking for a stick that produces the best sound for your particular drum set. As well as sound quality. It’s also important to get sticks that feel right for you. So, this is a balance between sound and feel. The only way to find the most suitable sticks for you is to try some out.
It’s important to try out a few different kinds to see which one feels best in your hand. And then see how they sound on your kit.
You should also think about the size and weight of the stick. A heavier stick will produce a louder sound, but it may be more difficult to control. The best way to find the perfect drumstick is to experiment with a variety of options. Until you find the ones that feel right for you. Here is a quick guide you can check out before going along to your local store to try some of these sizes out.
The letter describes the size of the stick. Whilst the number describes the stick’s diameter (or weight). The higher the number the thinner the stick. So 2B’s are quite thick. 5A’s are much thinner. 7A’s are thinner still.
| Size | Weight | Common Sizes (suggested use) |
|---|---|---|
| A (light) | 5A and 7A | 5A is the most common. 7A is lighter and used more for jazz. |
| B (medium) | 2B | 2B’s are more on the rock drumming side of things. |
| S (heavy) | 8″, 10″ | Very heavy sticks, used for marching bands. |
Drum Brushes
Drum brushes provide another level of sound to the drums. They are generally used for quieter music such as light jazz and even some liter rock/pop style music. Brushes come in a variety of shapes and sizes. And they can be made from different materials. Such as nylon, steel, plastic or plastic-coated steel.
 While some drummers prefer to use sticks for their entire performance. Others will use a mix of both sticks and brushes to create different sound textures. This as suggested depends on the style of music you are playing. In general, drum brushes provide a more gentle way to play the drums. Making them ideal for softer passages or intros/outros. again, depending on the style of music you’re playing.
The best approach to brushes is to play everything you can on the sticks using the brushes. They are usually a uniform size so your local store would be the best option for trying them out. Although, they are mostly the same. You may want to order a couple of different pairs online to test out what you like. And remember, if you can play it with sticks, you should also practice and play the same thing with brushes. So don’t neglect their use.
Drum Stool – Throne
The drum stool or drum throne is an essential part of any drum kit. More so than what you would think. Not only should your drum throne provide a comfortable place to sit while playing. Especially for long periods of time. But it also helps to keep the drums stable and in place before you.
There are a variety of different drum thrones on the market today. So it’s important to choose one that best suits your needs. For instance, if you have back or neck problems, you may want to consider a throne with back support. If you’re looking for a throne that’s easy to transport, then a folding chair or stool is a good option.
Ultimately, the best drum throne is the one that helps you play your best. Whilst at the same time keeping your back in tip-top condition. But that is more to do with how the drummer uses the throne and not the throne itself. With so many different options available, there’s sure to be a throne that’s perfect for you. Try a few out before buying and make sure it’s comfortable for you.
Conclusion
Well, that’s it for this basic drum kit setup article. We have covered all the basics. And although this article is only suitable for beginners, I do hope you got something out of it. I hope you’ve found this basic setup guide helpful. If you have any questions, please let me know in the comments below and I’ll do my best to answer them. Also, if there is anything you’d like to add, then feel free to comment below.
Thanks for reading!